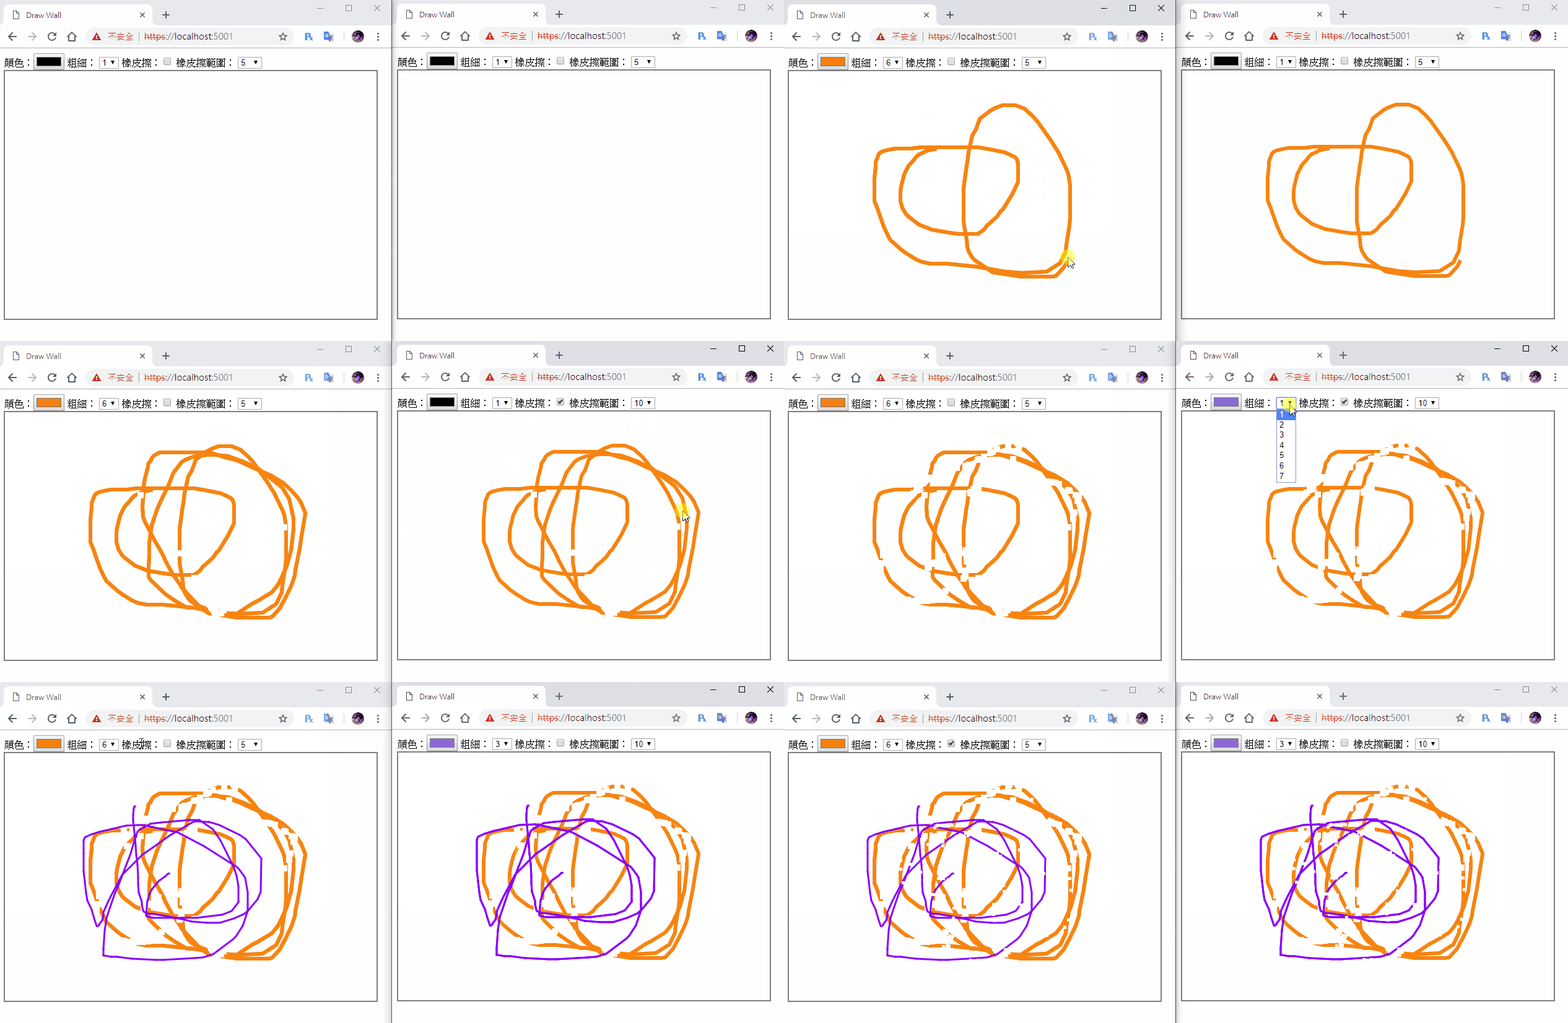
今天我們要幫塗鴉牆加上橡皮擦的功能,只能畫不能擦掉感覺真的是蠻奇怪的,當然擦的時候也要同時擦全部的畫版。
橡皮擦功能
這邊我在實作時,一開始是想到只有用透明色或是白色把畫過的地方重新上色就行,後來發現有Canvas有內建API可以達成。
使用clearRect()來做橡皮擦功能
clearRact可以設定一個矩形範圍來取消畫過的元素,先來看看定義
1
|
clearRact(x, y , width, height)
|
- x:清除x軸位置
- y:清除y軸位置
- width:清除寬度
- height:清除高度
先建立使用的Html element,一個checkbox切換畫筆或橡皮擦,一個select控制橡皮擦長寬,這部分加在畫筆粗細後方
1
2
3
4
5
6
|
橡皮擦:<input id="eraser" type="checkbox">
橡皮擦範圍:
<select id="eraserWidth">
    <option>5</option>
    <option>10</option>
</select>
|
JS載入設定要素
1
2
|
var eraser = document.getElementById('eraser');
var eraserWidth = document.getElementById('eraserWidth');
|
然後我們要修改一下mousermove的設定,在橡皮擦啟動時,是要擦掉而不是畫圖
 1
 2
 3
 4
 5
 6
 7
 8
 9
10
11
12
13
14
15
16
17
18
19
20
21
22
23
24
25
26
|
canvas.addEventListener('mousemove', function (e) {
    if (draw) {
        var newPos = [e.pageX - canvas.offsetLeft, e.pageY - canvas.offsetTop];
        // 判斷橡皮擦是否啟用
        if (eraser.checked) {
            var _eraserWidth = eraserWidth.value;
            ctx.clearRect(tempPos[0] - (_eraserWidth / 2), tempPos[1] - (_eraserWidth / 2), _eraserWidth, _eraserWidth);
        } else {
            ctx.beginPath();
            ctx.moveTo(tempPos[0], tempPos[1]);
            ctx.lineTo(newPos[0], newPos[1])
            ctx.closePath();
            ctx.stroke();
            connection.invoke("SendDraw", {
                "startPos": tempPos,
                "endPos": newPos,
                "color": ctx.strokeStyle,
                "lineWidth": ctx.lineWidth

            }).catch(function (err) {
                return console.error(err.toString());
            });
        }
        tempPos = newPos;
    }
});
|
x和y扣掉寬度除2是為了讓範圍中心對到點擊位置上,因為我覺得這樣會比較抓距離,還有記得跟Draw一樣的動作要拉出來。
同步到SignalR
首先我們的JSON格式需要更新下,我們多加一個mode和eraserWidth,mode用來辨認到底是畫筆還是橡皮擦,
其實也能寫成isEraser或isPen也行,但是Canvas其實還有很多其他功能,像是畫矩形、三角形、圓形、貝茲曲線…..,
所以我們要讓他可以變化大一點,用Mode來做這變數名會比較適合。
1
2
3
4
5
6
7
8
|
{
    "mode": "line",
    "startPos": [10, 20],
    "endPos": [40, 50]],
    "color": "orange",
    "lineWidth": 10,
    "eraserWidth": 5
}
|
然後一樣在mousemove時傳回Server
 1
 2
 3
 4
 5
 6
 7
 8
 9
10
11
12
13
14
15
16
17
18
19
20
21
22
23
24
25
26
27
28
29
|
canvas.addEventListener('mousemove', function (e) {
    if (draw) {
        var newPos = [e.pageX - canvas.offsetLeft, e.pageY - canvas.offsetTop];
        // 判斷橡皮擦是否啟用
        if (eraser.checked) {
            var _eraserWidth = eraserWidth.value;
            ctx.clearRect(tempPos[0] - (_eraserWidth / 2), tempPos[1] - (_eraserWidth / 2), _eraserWidth, _eraserWidth);
        } else {
            ctx.beginPath();
            ctx.moveTo(tempPos[0], tempPos[1]);
            ctx.lineTo(newPos[0], newPos[1])
            ctx.closePath();
            ctx.stroke();
        }
        // 回傳動作
        connection.invoke("SendDraw", {
                "mode": eraser.checked?'eraser':'line',
                "startPos": tempPos,
                "endPos": newPos,
                "color": ctx.strokeStyle,
                "lineWidth": ctx.lineWidth,
                "eraserWidth": eraserWidth.value
            }).catch(function (err) {
                return console.error(err.toString());
            });

        tempPos = newPos;
    }
});
|
接收事件ReceiveDraw我們需要加上一個switch來判定mode是什麼,在做不一樣的事情
 1
 2
 3
 4
 5
 6
 7
 8
 9
10
11
12
13
14
15
16
17
18
|
connection.on("ReceiveDraw", function (json) {
    switch (json.mode) {
        case 'line':
            ctx.strokeStyle = json.color;
            ctx.lineWidth = json.lineWidth;
            ctx.beginPath();
            ctx.moveTo(json.startPos[0], json.startPos[1]);
            ctx.lineTo(json.endPos[0], json.endPos[1])
            ctx.closePath();
            ctx.stroke();
            break;
        case 'eraser':
            var _eraserWidth = json.eraserWidth;
            ctx.clearRect(json.startPos[0] - (_eraserWidth / 2), json.startPos[1] - (_eraserWidth / 2), _eraserWidth, _eraserWidth);
            break;
    }

});
|
後端部分只需要更新DrawModel.cs的屬性就行了
1
2
3
4
5
6
7
8
9
|
public class DrawModel
{
    public string mode { get; set; }
    public int[] startPos { get; set; }
    public int[] endPos { get; set; }
    public string color { get; set; }
    public int lineWidth { get; set; }
    public int eraserWidth { get; set; }
}
|
到這邊就完成啦!
DEMO

範例下載
